


Overview
DIY Xpanda Extendable Window Bars combine welded steel strength with an adjustable design that fits a wide range of residential window sizes. Designed for homeowners, landlords, and property managers, they help strengthen vulnerable windows while creating a visible deterrent against break-ins. The extendable design provides flexibility across different openings without requiring custom fabrication, making them a practical DIY security upgrade for NZ homes and rentals.
For larger commercial installations or engineered security requirements, Xpanda Security provides custom welded security bars, purpose-built for maximum strength and full-span protection.
Top Features
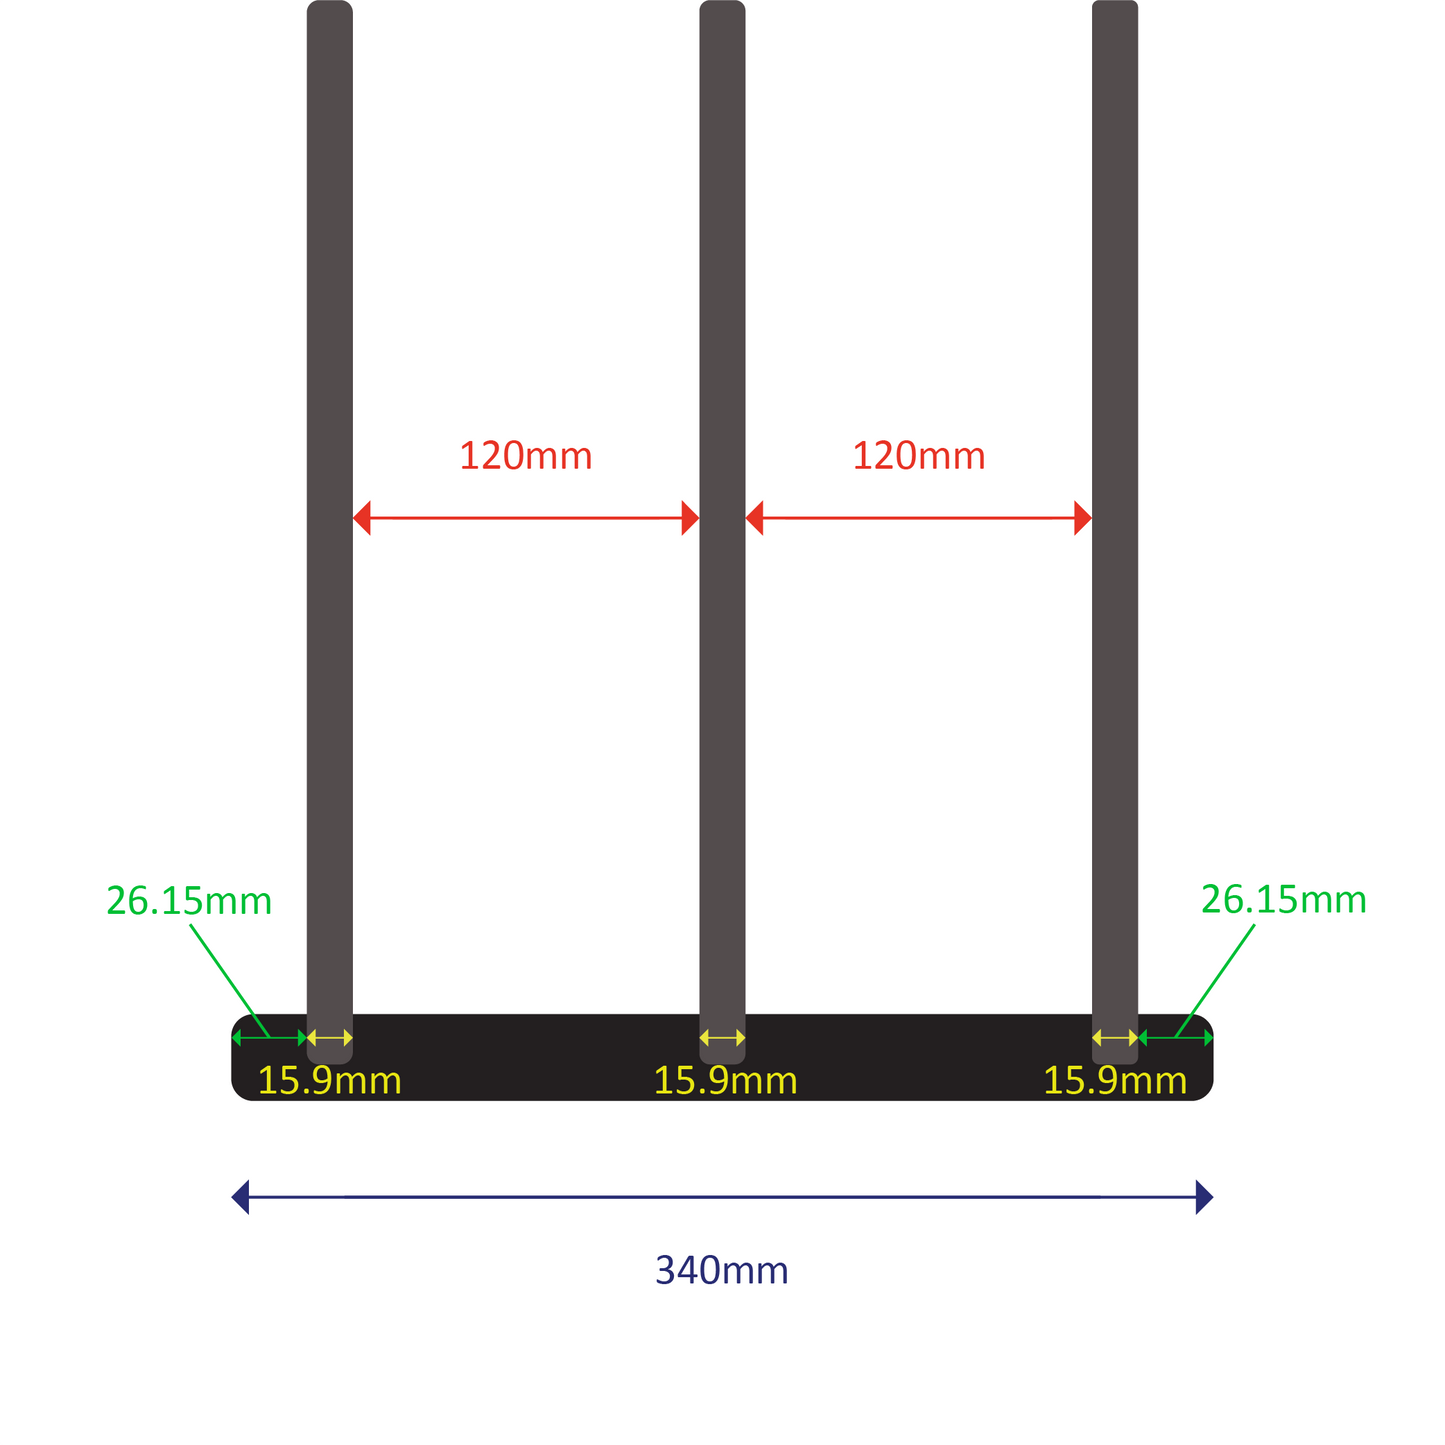
- Welded steel construction with 3 round bars
- Fixed length: 340mm
- Expands from 900mm to 1650mm (two sliding welded sections)
- Bar spacing: 120mm
- Outer bar diameter: 15.9mm | Inner bar diameter: 12mm
Key Strengths
- Strong Protection for Vulnerable Windows
Built from welded steel to create a strong visible barrier that helps strengthen vulnerable windows and discourage forced entry attempts. - Extendable Design
Two sliding welded sections allow adjustment across a wide range of residential window sizes while maintaining rigidity and strength. - Designed for NZ Homes & Rentals
Ideal for ground-floor windows, rental properties, garages, and residential spaces needing practical DIY protection. - DIY-Friendly Installation
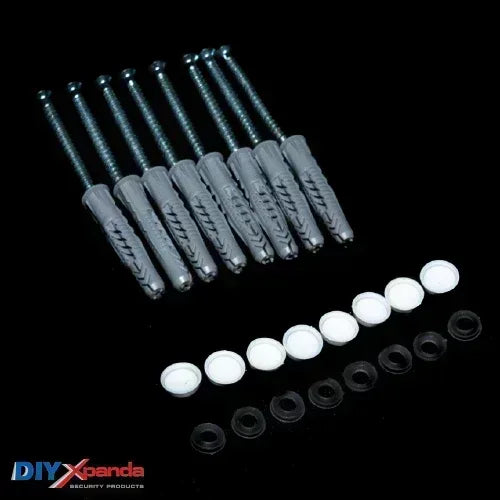
Includes heavy-duty fixings and installation instructions (video + PDF). Installs using basic tools in approximately 30 minutes.
Applications
- Wider ground-floor windows
- Homes, flats, and apartments
- Rental properties
- Garages and workshops
- Small offices and retail spaces
Installation Guide
Tools and Materials for Installing Extendable Window Bars
Extendable Window Bars are one of the simplest and most effective ways to improve window security. This guide explains the basic installation process for DIY Xpanda Window Bars using common household tools.
Step 1: Measure Inside Your Window Frame
Begin by measuring the inside width and height of your window frame.
Particularly inside the window frame's reveal.

These measurements will help determine:
- The correct window bar size
- Whether the bars should be installed horizontally or vertically
- Whether multiple bars are required for larger openings
Take your time during this step, as accurate measurements are essential for a secure installation.

Important: To maintain strength and rigidity, avoid selecting a bar that is expanded to its absolute maximum width or height.
For example, if your window opening is 900mm wide, avoid choosing a bar with a maximum width of 900mm. Instead, choose a larger size such as 1100mm or 1650mm and install it partially expanded for improved strength.
Round Bars vs Square Bars
Round Window Bars are designed for installation inside the reveal (sill-fix).
Square Window Bars can be installed inside the reveal or mounted over the face of the frame (face-fix), providing additional installation flexibility.


Step 2: Gather Your Tools and Materials
Before beginning, make sure you have the following:
- DIY Xpanda Window Bars
- Measuring tape
- Pencil or marker
- Drill and suitable drill bits
- Screws and fixings (included)
- Screwdriver
- Spirit level


Step 3: Mark the Mounting Points
Position the bars where they will be installed and mark the locations for the mounting brackets.
Use a spirit level to ensure the bars will be straight and evenly aligned. Double-check all measurements before drilling.
Step 4: Drill the Holes
Drill holes at the marked locations.
If installing into brick, concrete, or masonry surfaces, use the appropriate drill bit and wall anchors.
Taking a little extra time here will help ensure a secure and professional-looking installation.

Step 5: Attach the Mounting Brackets
Secure the mounting brackets using the supplied screws and fixings.
Ensure all brackets are firmly attached and properly aligned, as they provide the foundation for the installation.

Step 6: Install the Window Bars
Expand the window bars to suit the opening and position them within the mounting brackets.
Check that the bars are level and centred before tightening all adjustment screws and fixings.

For a detailed installation demonstration, watch our video guide:
Watch the Window Bar Installation Video
Step 7: Test the Installation
Apply gentle pressure to the bars to confirm they are firmly secured.
The bars should feel stable with minimal movement. If necessary, tighten the mounting brackets or adjustment screws and make any final alignment adjustments.
Before finishing:
- Check all screws and fixings are tight
- Confirm the bars are level
- Remove any installation debris
- Verify the installation is secure
Your window bars are now ready to provide a strong visual deterrent and an additional layer of protection for your home, rental property, garage, or other vulnerable openings.
Need Help Choosing the Right Size?
If you're unsure which window bars are best for your property, send us:
- Window measurements (width and height)
- A photo of the opening
- Your preferred installation method
Our team can help recommend the most suitable window bars for your home or rental property.