


Overview
The Homestyle Shootbolt Metal Security Gate provides everyday protection with the added strength of a shootbolt lock. Ideal for side entrances, it balances affordability with robust steel security.
*For larger or higher-risk sites, Xpanda recommends our custom welded security gates for maximum strength.
Top Features
- Width: 770mm | Height: 1950mm
- Mild steel, zinc plated + epoxy coated
- Type: Fixed swing gate
- Lock type: Shootbolt
Key Strengths
- Practical Pedestrian Gate:
Often used as a garden or side gate, offering both convenience and security. - Secure Shootbolt Locking:
Strong mechanical locking system adds extra protection. - Weather-Resistant Finish:
Built for NZ outdoor conditions, (Perhaps not coastal) - Simple to Maintain:
Fixed swing design with no sliding parts to wear or jam.
Applications
- Homes and gardens
- Side entrances and pedestrian walkways
- Small commercial entrances
What’s Included
- Homestyle gate panel (steel, coated finish, 770mm wide)
- Shootbolt lock
- V-Hinges
- Lock Protection Plate
- Lock Keep
- Fixings
- Instruction guide
Homestyle gate panel (steel, coated finish, 770mm)


- Panel Height: 1950mm
- Panel Width: 770mm
- Panel Thickness: 25mm
Shootbolt lock

V-Hinges

- Hinge Width: 60mm
- Hinge Height: 75mm
- Hinge Thickness: 1mm
Lock Protection Plate

- Lock Protection Plate Width: 165mm
- Lock Protection Plate Height: 50mm
- Lock Protection Plate Depth: 25mm
- Lock Protection Plate Thickness: 1mm
Lock Keep

- Lock Keep Width: 25mm
- Lock Keep Height: 130mm
- Lock Keep Depth: 25mm
Fixings


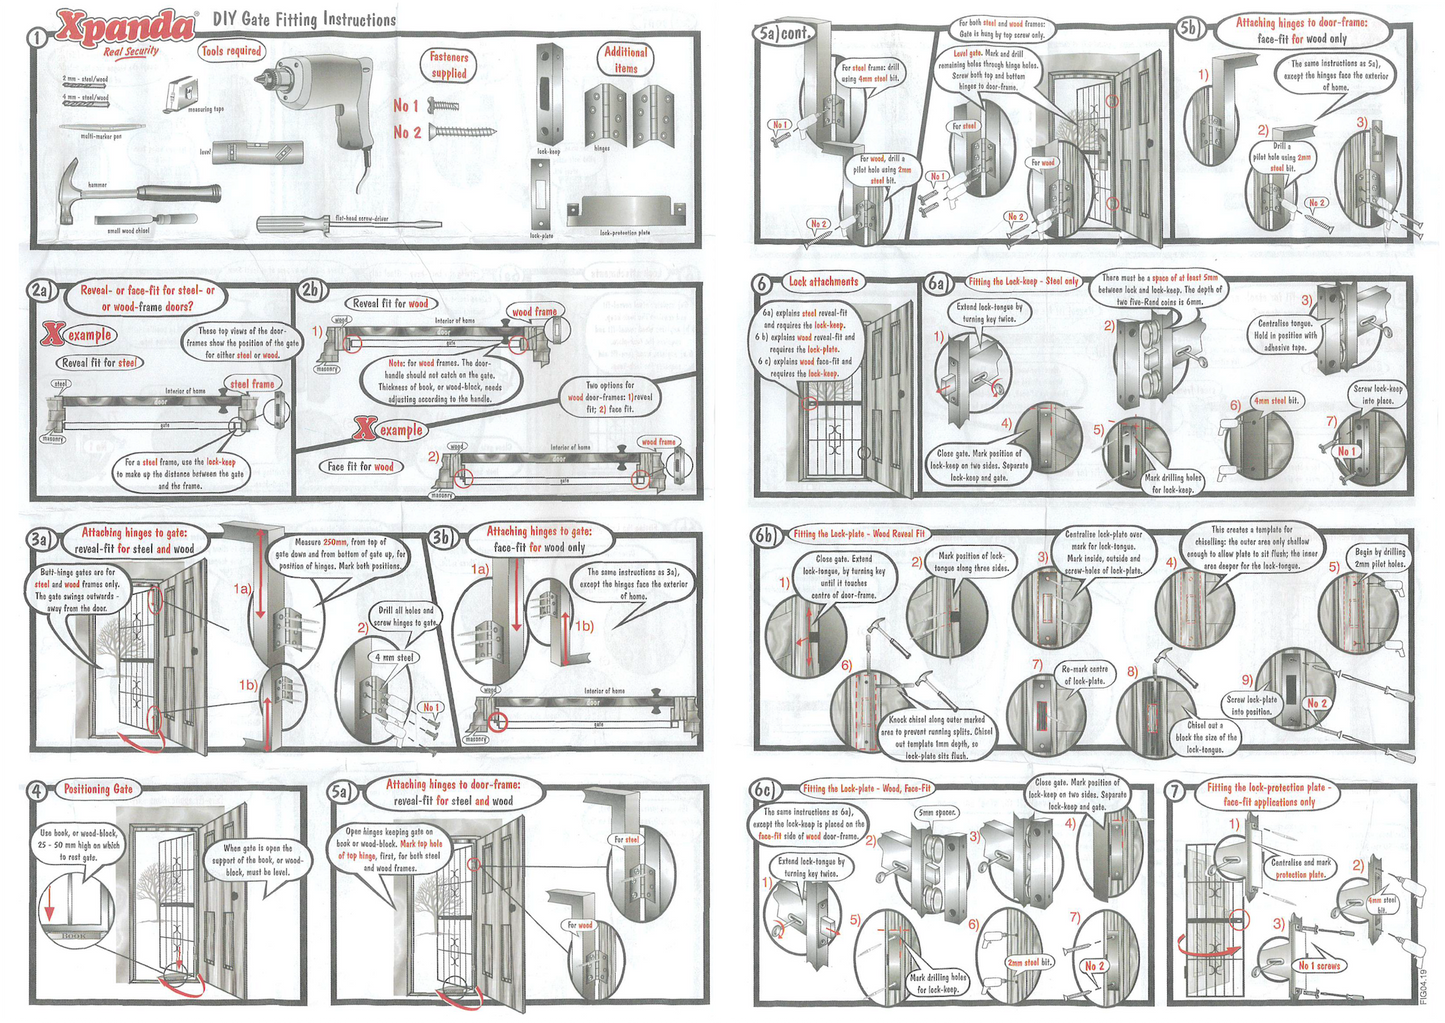
Instruction guide

Please click here to download the pdf version.
Installation Guide
Please click here to download the pdf version.
🔧 Tools Required
- 🛠️ Drill & drill bits (masonry/timber)
- 🔩 Screwdriver
- ✏️ Pencil/marker
- 📏 Measuring tape
- 📐 Spirit level
- 🧱 Wall plugs & screws (included)
1️⃣ Position the Gate Frame
- 🚪 Hold the gate frame in place at the door opening.
- 📐 Ensure it is level and upright.
- 🔄 Confirm the gate can open without obstruction.
- ✏️ Mark all fixing-hole positions.
2️⃣ Drill Fixing Holes
- 🧱 Remove the gate and drill holes at the marked points.
- 🔩 Insert wall plugs if installing into brick, block, or concrete.
3️⃣ Fix the Hinge Side
- 🔧 Reposition the gate.
- 🔩 Secure the hinge side of the frame with screws.
- ✔️ Check that the gate swings smoothly.
4️⃣ Align & Fix the Locking Side
- 🚪 Close the gate to check the alignment.
- 🎯 Ensure the shootbolts line up with the top and bottom receiver positions.
- 🔩 Fix the lock-side frame securely.
5️⃣ Install the Shootbolt Receivers
- ↕️ Extend the shootbolts to mark where they land (top & bottom).
- 🔩 Install the receivers at the marked points.
- ✔️ Test that the shootbolts engage smoothly.
6️⃣ Fit the Handle & Lock
- 🔐 Attach the handle/lockset to the pre-drilled holes.
- 🔧 Tighten screws.
- ✔️ Test locking and opening functions.
7️⃣ Final Checks
- ✔️ Gate opens and closes smoothly.
- ✔️ Shootbolts slide fully into receivers without force.
- ✔️ All fixings are secure.
- 🛢️ Lubricate hinges/shootbolts lightly if required.
CUSTOM ORDER?
